
If you’re like me and find the OpenVAS installation to be a challenge, then this guide might be of some use to you. Keep in mind that the process outlined below is relevant as of its writing and newer versions of OpenVAS are subject to change the flow laid out below.
The Problem
I’ve been itching to work closer with the DevOps teams at my job, and recently was offered a challenge of setting up Greenbone’s OpenVAS. While I was familiar with security scanners like those one might find in Kali Linux (Burp, Nikto, SSLSCAN), I wasn’t familiar with an infrastructure scanner like OpenVAS.
Initially I thought it would be an easy task to set this up, so I opened a session to my home Debian server and tried following the instructions for installation (non-container installation). 12 hours in I was banging my head and feeling like a fool. “Why isn’t this working,” I shouted at my monitor in disbelief of the mockery. I had installed the packages, I had waited the customary time for the feeds to download their data, and yet I was unable to run a simple default scan on a host (getting the error, “_____ config not found.”)
The next day I tried a new approach – ride the coattails of others. I found a Docker container by Immauss that had resolved all of the issues I was facing. It worked wonderfully at home, but I couldn’t sell a non-official OpenVAS container to my company. If you want to check it out, it can be found over on Github.
That’s when I discovered the official Docker container of OpenVAS and as of this writing, it is the easiest method (in my humble opinion) to install it. It’s odd that the search penetration of non-official containers is far greater, and the official container is rather tricky to navigate to.
Official OpenVAS Setup
If you’re installing on a new VM, be sure to have curl installed first.
If you have used Docker on the VM in the past, you may need to remove the old docker-compose and install the new docker-compose. Note, all my steps are using Debian:
# check your version of docker-compose, you'll need 1.29 or higher:
sudo docker-compose -version

# if you have an older version, remove it:

sudo apt-get remove docker-compose-plugin

# once done install version 1.29+ of docker-compose, like so (this is for 1.29.2):

sudo curl -L "https://github.com/docker/compose/releases/download/1.29.2/docker-compose-$(uname -s)-$(uname -m)" -o /usr/bin/docker-compose

sudo chmod +x /usr/bin/docker-compose

# verify the version updated

sudo docker-compose -version
Here’s my next steps on the installation process:
sudo usermod -aG docker $USER && su $USER

export DOWNLOAD_DIR=$HOME/greenbone-community-container && mkdir -p $DOWNLOAD_DIR

cd $DOWNLOAD_DIR && curl -f -L https://greenbone.github.io/docs/latest/_static/docker-compose-22.4.yml -o docker-compose.yml

docker-compose -f $DOWNLOAD_DIR/docker-compose.yml -p greenbone-community-edition pull

docker-compose -f $DOWNLOAD_DIR/docker-compose.yml -p greenbone-community-edition exec -u gvmd gvmd gvmd --user=[USERNAME] --new-password=[YOUR PASSWORD HERE]

docker-compose -f /home/bwarner/greenbone-community-container/docker-compose.yml -p greenbone-community-edition up -d

# Once docker is started, you can tail the logs like so:

sudo docker-compose -f /home/bwarner/greenbone-community-container/docker-compose.yml -p greenbone-community-edition logs -f
Login and Setup a Scan
The above flow isn’t so rough. It’s bypasses a lot of the pain I went through. Once the Docker for OpenVAS is running, you can go to your IP:9392 and it will load the login screen. Enter the user you created in the block above (whatever username and password you entered).
NOTE: A big note regarding Feeds
You’ll have to wait awhile… for some it’s 30m, for others it’s a day. Monitor the logs, and see if it’s still downloading feed content. This content amounts to various scan related updates. If this isn’t downloaded you may not be able to fully scan a target. One of the upsides of Immauss’ Docker is that it comes preloaded with the feeds! So you can get to scanning instantly.
Dashboard

Post login you’ll see a screen like the one above. Mine has colored pie charts due to previous scans. In the bottom left corner is a graph showing various CVE’s (Common Vulnerabilities and Exposures). CVE’s represent various attack vectors or vulnerabilities that have been reported. OpenVAS can scan a target for these vulnerabilities.
Quick Scan
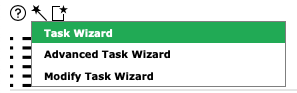
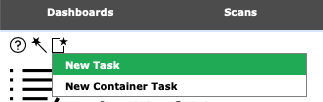
A quick scan can prove you are up and running. Click the Scan tab and then mouse over the magic wand and choose “Task Wizard.”
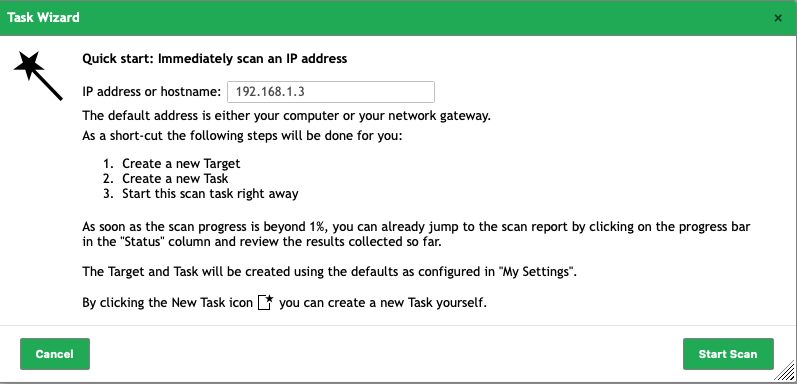
The Task Wizard will load a modal window like the one below. Simply input a host you have permission to scan, and continue. It picks some default choices for you and starts the scan.
The scan itself will appear in the bottom half of the Scan section. It will go through several phases, updating on its own. It will start with a requested scan, then queue phase, then have a percentage that represents the progress of the scan and then a “Done” value for when the scan is completed. On the right side of the scan are stop, play/replay and other buttons.

Reports
To see a report, well it’s not very obvious! The UI here is a bit confusing. You click the numeric value on the line item in the scan result (lower half of the scan section). Once you click that button you end up in a page that is not the report itself. It looks like this:
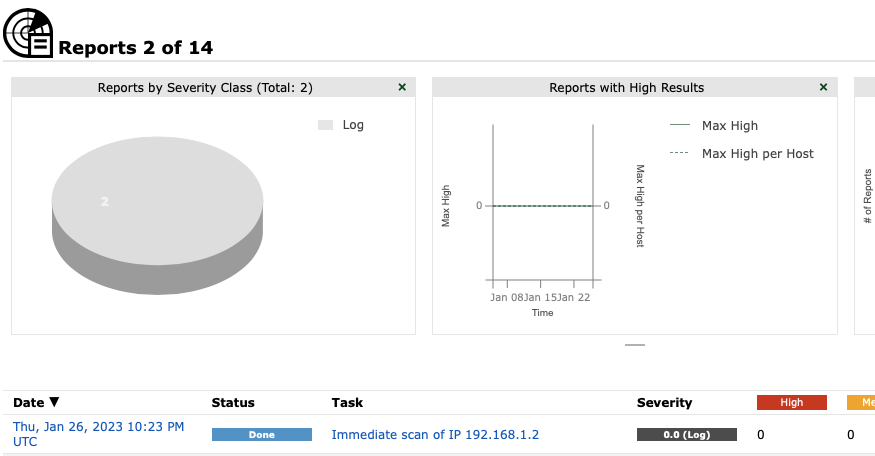
Next, you must click on the Date! That’s right, the Date will link to the report. If you click the linked words under the Task column, you’ll end up editing the scan task itself. So click the date on this line item and you’ll now get the report details:
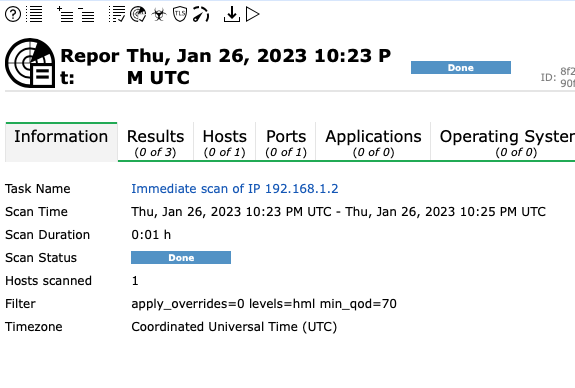
The above scan was a bust. However, if items were found in discovery, they would present themselves here. You would see the results tab with values, the host tab with the hosts discovered, and so on.
The Problem of No Results
Like the screenshot above, you may get situations where the scan is fast (too fast) and results in almost nothing returned. Often this is the case of the host not being discovered. You can create a Scan task and modify how the host is being discovered (even assuming it is available).
Creating a Scan Task
When you create a scan task, you have a lot more options available. I’m going to run through some common things and end with something I’ve not seen discussed much (package maintenance).

The Scan Task modal looks like the one above.
Scan Target
For scan target, you click the file symbol to the right, to create a new Scan Target:

The New Target modal has some interesting fields. You can input the Hostname or IP in the field next to “Manual,” or you can upload a file of hostname/ip’s to scan. There is also a host exclusion, if that is something you need to do, the option is available in the Host section.
I leave the “Allow simultaneous scanning via multiple IPs” defaulted to Yes.
Port List: By default it only scans TCP ports. The default All IANA assigned TCP is probably very good, and I often use it. However, as I may need specific ports to scan, the option to create your own Port List is found by the File icon next to the dropdown.
Keep in mind that UDP scanning is VERY SLOW. If you were to scan a thousand UDP ports, your scanner will be at it for hours (like 10 hours per host). If you want to focus on the ports you know are open and running services, creating your own port list uses a modal like this:
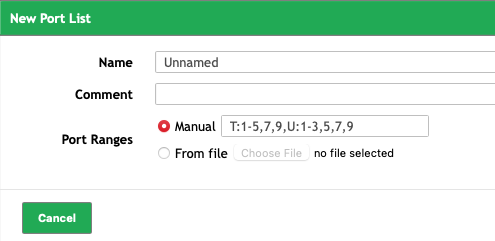
The port list is typed (if done manually) like # – # or #, #, #. T: is for TCP ports and U: for UDP ports.
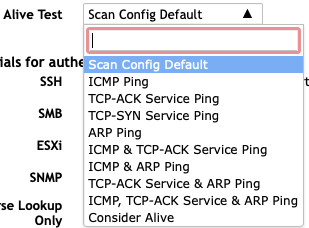
Alive Scan: This is the way in which the host is determined to exist/up. The default can be changed to a variety of values, including “Consider Alive”:
Security: I’ll get back to this in a bit. For now… saving this will return to the main Scan Task modal.
Scanner: For a first time scan, you must keep it on OpenVAS as the scanner type. If you pick CVE Scanner, it won’t return any results. According to the official response in the forums, this is a logical use of the tool. They designers don’t anticipate someone using a CVE scan before a standard Scan… It’s a bit confusing because both scanners will return CVE results. The CVE one, however, produces a plethora of depth.
Leaving the rest of the defaults as they are, click Scan on on the target you are allowed to scan.
Check the report (as outlined prior) and see if you picked up anymore data. If your scans are fast and not producing a host, or result, change the Scan Target “alive test” to “consider alive” or another value in the list.
Package Scans
One of my DevOps tutors explained to me that while my OpenVAS scans did find results, they weren’t what they expected. He explained that I should be getting hundreds of hits on a machine related to packages. After working with him for a few hours we got OpenVAS to scan inside a machine (as root) to find all vulnerable packages. This is a great way to spot what should be updated for maintenance reasons.
Scans as Root
There is a risk/reward here. A few years back a security tester discovered he was able to penetrate a client’s network and accessed their OpenVAS system – which allowed him to download the keys for root access. This has evidently been patched in the current version, but I feel I should mention it.
When you create a new Scan Task, the Scan Target modal has information relating to security. Specifically it mentions “Credentials for Authenticated Attacks.” Next to the SSH dropdown there’s a file icon, click it.
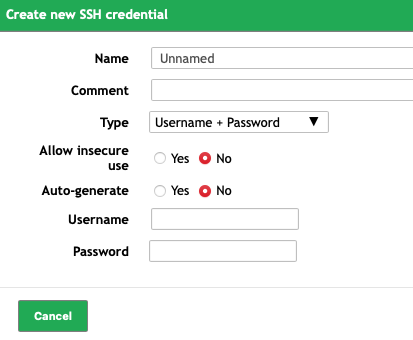
Once you are on the Create new SSH credential modal, click the Type dropdown.
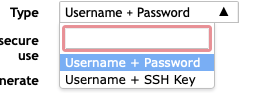
There is a choice between username/password and Username + SSH Key. For the latter, you’ll need to create a private key for the root user of the machine you are testing. When you chose that option a “browse” button will appear, allowing you to upload the key. You enter the name of the user (i.e. root) and then upload the ssh key.
Once you do this, your scan on the host will be entirely different. Where you may have gotten a few hits on minor issues, you’ll likely now have 80+ vulnerable packages reported. You might find packages you don’t even need on the host… such as Postgres (and you don’t even use it!) The report will outline each CVE vulnerability for you to itemize upgrades on the system.
Summary
OpenVAS is a great utility for scanning. It has some drawbacks in the installation and the UI/UX departments. However, once it’s installed and running it can provide a great scan of your infrastructure, as well as vulnerable packages installed on a machine(s).